drprettypatty

LD28

Only One: A Gentleman’s Game is finished!

Dashing

A shot from the main game screen

This is my second game jam, and first Ludum Dare! You can find my game here. I’m pretty happy with how this turned out, my art was better than expected and the only things that I really want to work on are the transitions between screens. I kind of jumped off an idea I had for the Duel theme and it ended up matching pretty well (you only get to use one hand in a dignified battle with your rival). It was fun, and although I would’ve like to have had more time (I had to work a shift on Saturday), I think that the space gave me more time to clear my head and think about it. Enjoy!

LD29

Rating question…

So I just realized that in the majority of the games I rated, I set the ratings, went through the comments, wrote a comment, then hit the save button at the bottom.. which saved the comment but not the rating, leaving my ‘coolness’ a significant ways behind.. would it be bad to rate all the games in a short period of time while they’re still fresh in my head? I don’t want to get stuck with an L label :/

Comments

pythong
28. Apr 2014 · 06:16 UTC
there are 2 comment boxes, non-anonymous and anonymous. You have to write your comment in the non-anonymous box (seperate save button), elsewise your rating will not be saved

~Sail~ Postmortem

SailScreenshot

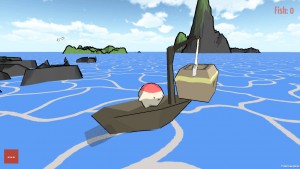
Sail is my third game jam entry, and my second Ludum Dare entry! I applied a lot of the things that I learned from the previous competitions, and although there were a few hiccups, this has been my most successful game jam by far.

Process:

  • I mostly stuck to tools that I was familiar with, and that let me be wayyy more productive than I was with previous competitions. For Glass of Water, it was my first time using Unity so there was a lot of experimentation and learning that ate much of the time, and with Only One, it was the first time I used the 2D tools in Unity. This time around, I primarily developed in Unity, GIMP, and Blender, all of which I’ve been using almost daily for the past few months.
  • To elaborate on mostly, the problems I encountered were in using tools that were new to me. The Scaffolding GUI framework was great, but I only spent a day playing around with it before the competition. It shows in the final product in certain resolutions, and it forced me to try to lock the aspect ratio to 16:9 to avoid distortions.
  • I didn’t start with a fully fleshed out idea of the game beyond a Wind Waker-y treasure hunt, but as soon as I had that idea I started cranking out models in Blender and putting the core together in Unity. Some of the work (mostly modeling) wasn’t very mind intensive, so I let it wander and came up with add-on ideas, some of which made it into the game (the squid) and much of which didn’t.
  • I worked a full 8-hour shift on Saturday, but I don’t really look at it as lost time. I also had full nights of sleep this time around. I think that the extra rest and the work break from the game let me recharge and be a lot more productive than I would’ve if I just ground through the whole thing ramped up on caffeine like the last couple jams. It would’ve been nice to only have to have worked for 4 hours, but what can ya do 😛

Graphics:

  • I was pretty confident that I could do a 3D game even though I only learned to model and animate about two months ago. I’ve been spending a lot of time recently modeling for Homestead, I’m really happy with the results, and I’ve got a process down that actually flows pretty quickly (I’m actually working on a series of blog posts on it, so keep an eye on this site if you’re a programmer who can’t model!).
  • The design for Pudge (the cute little main guy :D) was actually an idea I had a while back that I’ve been itching to create. I never actually modeled or drew the character, but all my ideas for the possible themes this time around involved him and other adorable rolly-poly characters like him.
  • I picked the colors for the game based mostly in the same way that I pick the colors in Homestead: basically, I love how desaturated and bright colors look on my low-poly models when cell-shaded, so I stuck with that.I actually started with Unity’s default water, but towards the end of the first day I realized how similar my game ended up looking to Wind Waker so I made my own texture emulating that to put on a plane and learned how to scroll the UVs for a watery effect.

Design:

  • I really wanted to make a game based around chubby cute characters, so I kept that idea in mind when making Pudge and the squid. The squid’s dialogue just kind of came to me towards the end of the second day; I wanted him to be big and dumb, but unintentionally wise at the same time. Also, I really wanted to use the opportunity to actually write out the strange noises I make sometimes 😛
  • I played around a bit with the fish splashes to try to make them more visible from a distance, but then realized that if I put birds above them I could make the splashes look decent while still being identifiable from far away. I dropped a hint for this in the squid dialog, but I think I could’ve tried to make it a bit less obscure (maybe an icon for the net activating)
  • I did want to add a few extra effects to make it more clear what was happening (fish flying into your boat as you drag the net, fish flying into the squid’s mouth when you’re near him, maybe a ping when you’re near treasure when you have the map for it), but I didn’t have the time. Also, I was planning on having the treasure chest just being one of the objects you find, the rest being other interesting artifacts from under the sea :)
  • ***SPOILER*** The ending was a bit brutal 😛 I put it together right at the end, and I was tired, and a nice king-of-the-sea thing seemed too cliche. Plus, I kind of like the whole “dark and cute” aesthetic. However, I think I’ll expand this game, and I have a few alternate endings planned that aren’t so cruel. ***END SPOILER***
  • One last design decision that I think is really important to note is the basic “collect X amount of Y” form of progression. I mentioned this in my Glass of Water postmortem, and I think it’s extremely important to success in developing a full game in a tiny time-frame. Once I had the core gameplay down, all I really needed to do to extend the experience was to clone the “chest” gameobject, move it somewhere else, and crudely draw a map for it. This differs from Glass of Water, where I would’ve had to plan out an entire jump scare or scene and do a lot of extra scripting and modeling for each extra 30 seconds or so of gameplay. Obviously you don’t want to artificially extend the game by making the players collect 150 of the same object and boring them to death, but when you apply this pattern (waves of enemies also fits this in my opinion) with a good amount of balance I think it can work really well.

Thanks to everyone who has played my game! All the positive comments have had me buzzing all week, and the critical ones are very helpful! Like I said before, I’m working on a series of articles detailing my Blender and Unity workflow, so if 3D modeling seems impossible (or getting Blender models into Unity properly seems impossible :P) check back here or at my site over the next couple days! I hope that sharing my experiences doing these game jams helps a few people out.

Blender to Unity Workflow! Part 1

zakjr-blender-unity

As promised, I’ve been working on writing out a tutorial on my personal workflow, and the same process I used in Sail! It’s aimed towards people who work with Unity3D but don’t know the first thing about modeling (it’s a lot easier than you’d think!), but it can also be useful to people who get frustrated with importing Blender models into Unity properly. This is just the intro, but I’m shooting for one article a day for the next week or so!

—–

Free modeling and image editing software exists, and the free game engine Unity exists. However, I haven’t been able to find a good start to finish guide on a workflow between these things, so I figured why not contribute something to the indie game making community for once! In this series of posts, I’m going to outline my personal workflow between Blender 2.70, GIMP 2.8, and Unity3D 4.

Read the rest on my site!

zakjr-blender-unity

Part 5 of my tutorial series on beginner Blender modeling and getting it to behave with Unity is up! This post is a bit short, but it covers making the actual texture for your character. I give a few tips on stylistic choices, but it’s mostly up to you! Also, there’s a bit about getting the texture into Blender.

SailScreenshot

I created Sail using this process, so if you like my style of low-poly graphics and are wondering how on earth I made the models, UV’d, textured, rigged, and animated them all in 48 hours, you might be interested in this series! I’m trying to crank out a post per day for the next week, each covering a different aspect of the workflow.

Also, I’m totally open to feedback on these articles! Please let me know if any parts are confusing, or overdrawn, or straight-up wrong! You can leave a comment here, or on my site (no email or registration is required–  you can leave any or all the fields blank in the comment form), or let me know on Twitter!

—–

We’re going to take a break from Blender for a while! I’ll be using GIMP to make the texture, but the concepts should be the same whether you prefer Photoshop or anything else. First, you’ll want to open up characterUV.png in GIMP or whatever your image editor of choice is.

Create a new transparent layer (Layer->New Layer or Ctrl-Shift-N) and drag it beneath the UV layer. The UV layer acts as a blueprint, so paint everything on the new layer! It’s up to you how to paint the character, so I’ll just give a few pointers…

Read the rest on my site!

Blender and Unity Workflow: Part 6 is up!

zakjr-blender-unity

Part 6: Rigging of my tutorial series on beginner Blender modeling and getting it to behave with Unity is up! This is a longer one, but should make everything involving setting up the bone structure of your character clear and easy to understand! There are also lots of screenshots, so you won’t get lost 😀

SailScreenshot

I created Sail using this process, so if you like my style of low-poly graphics and are wondering how on earth I made the models, UV’d, textured, rigged, and animated them all in 48 hours, you might be interested in this series! I’m trying to crank out a post per day for the next week, each covering a different aspect of the workflow.

Also, I’m totally open to feedback on these articles! Please let me know if any parts are confusing, or overdrawn, or straight-up wrong! You can leave a comment here, or on my site (no email or registration is required–  you can leave any or all the fields blank in the comment form), or let me know on Twitter!

—–

Rigging is the process of adding “bones” to a mesh, greatly simplifying the animation process. Each bone is associated with the nearby vertexes on your mesh, so when you transform a bone, it will drag the vertices with it. The entire set of bones are collectively called an “armature,” or a “rig.”

First off, you’ll want to set up the Blender UI to make rigging your character a bit more manageable. Change your UV frame back to a 3D Viewport, activate Object Mode (Tab, and this will change both of your viewports to Object Mode), and set the shading mode to Solid on both views. You’ll also want to set the left viewport to a front ortho view (Numpad 1) and the right viewport to a left ortho view (Numpad 3).

Read the rest on my site!

Blender to Unity Workflow- Part 7 is up!

zakjr-blender-unity

Part 7: Animating of my tutorial series on beginner Blender modeling and getting it to behave with Unity is up! This covers creating basic animations in Blender, keyframing, what the Dope Sheet is and Actions are, and a few useful techniques!

SailScreenshot

I created Sail using this process, so if you like my style of low-poly graphics and are wondering how on earth I made the models, UV’d, textured, rigged, and animated them all in 48 hours, you might be interested in this series! I’m trying to crank out a post per day for the next week, each covering a different aspect of the workflow.

Also, I’m totally open to feedback on these articles! Please let me know if any parts are confusing, or overdrawn, or straight-up wrong! You can leave a comment here, or on my site (no email or registration is required–  you can leave any or all the fields blank in the comment form), or let me know on Twitter!

—–

We’re ready to add some animations to our character! Like with previous steps, we’ll want to set up the Blender UI to make animating our little guy a lot easier. First, close the left 3D viewport by dragging the bottom left corner icon of the right 3D viewport. Now, raise up a thin frame from the bottom using the same icon. Next, re-open a left frame, once again using the same icon.

Set the big left viewport’s type to “Dope Sheet” with the Type Selector. The dope sheet is basically Blender’s animation editor. Change its editing mode to “Action Editor”. This is the mode that allows you to work with a particular “action,” and in the context of what we’re doing, each “action” represents a separate animation clip in Unity. Finally, change the type of the narrow bottom frame to “Timeline.” The Timeline shows what frame you’re on in the animation, and it provides a few playback controls. However, you’ll want to keep in mind that it’s mostly a read-only kind of tool, and you’ll be doing the actual editing in the dope sheet.

Read the rest on my site!

My Blender to Unity Workflow tutorial series is complete!

zakjr-blender-unity

I just finished Part 8: Importing into Unity! This concludes the tutorial, which takes you through the entire modeling, UV mapping, texturing, rigging, and animating process from scratch! You can find the first post in the series here. Thanks to everyone who left feedback, both constructive and positive!

SailScreenshot

I created Sail using this process, so if you like my style of low-poly graphics and are wondering how on earth I made the models, UV’d, textured, rigged, and animated them all in 48 hours, you might be interested in this series!

Also, I’m totally open to feedback on these articles! Please let me know if any parts are confusing, or overdrawn, or straight-up wrong! You can leave a comment here, or on my site (no email or registration is required–  you can leave any or all the fields blank in the comment form), or let me know on Twitter!